Building a mapping platform with React and Mapbox GL
I built Trail Routes as a way to share some of the best running & hiking routes I've discovered, and in this post I will outline the build process.
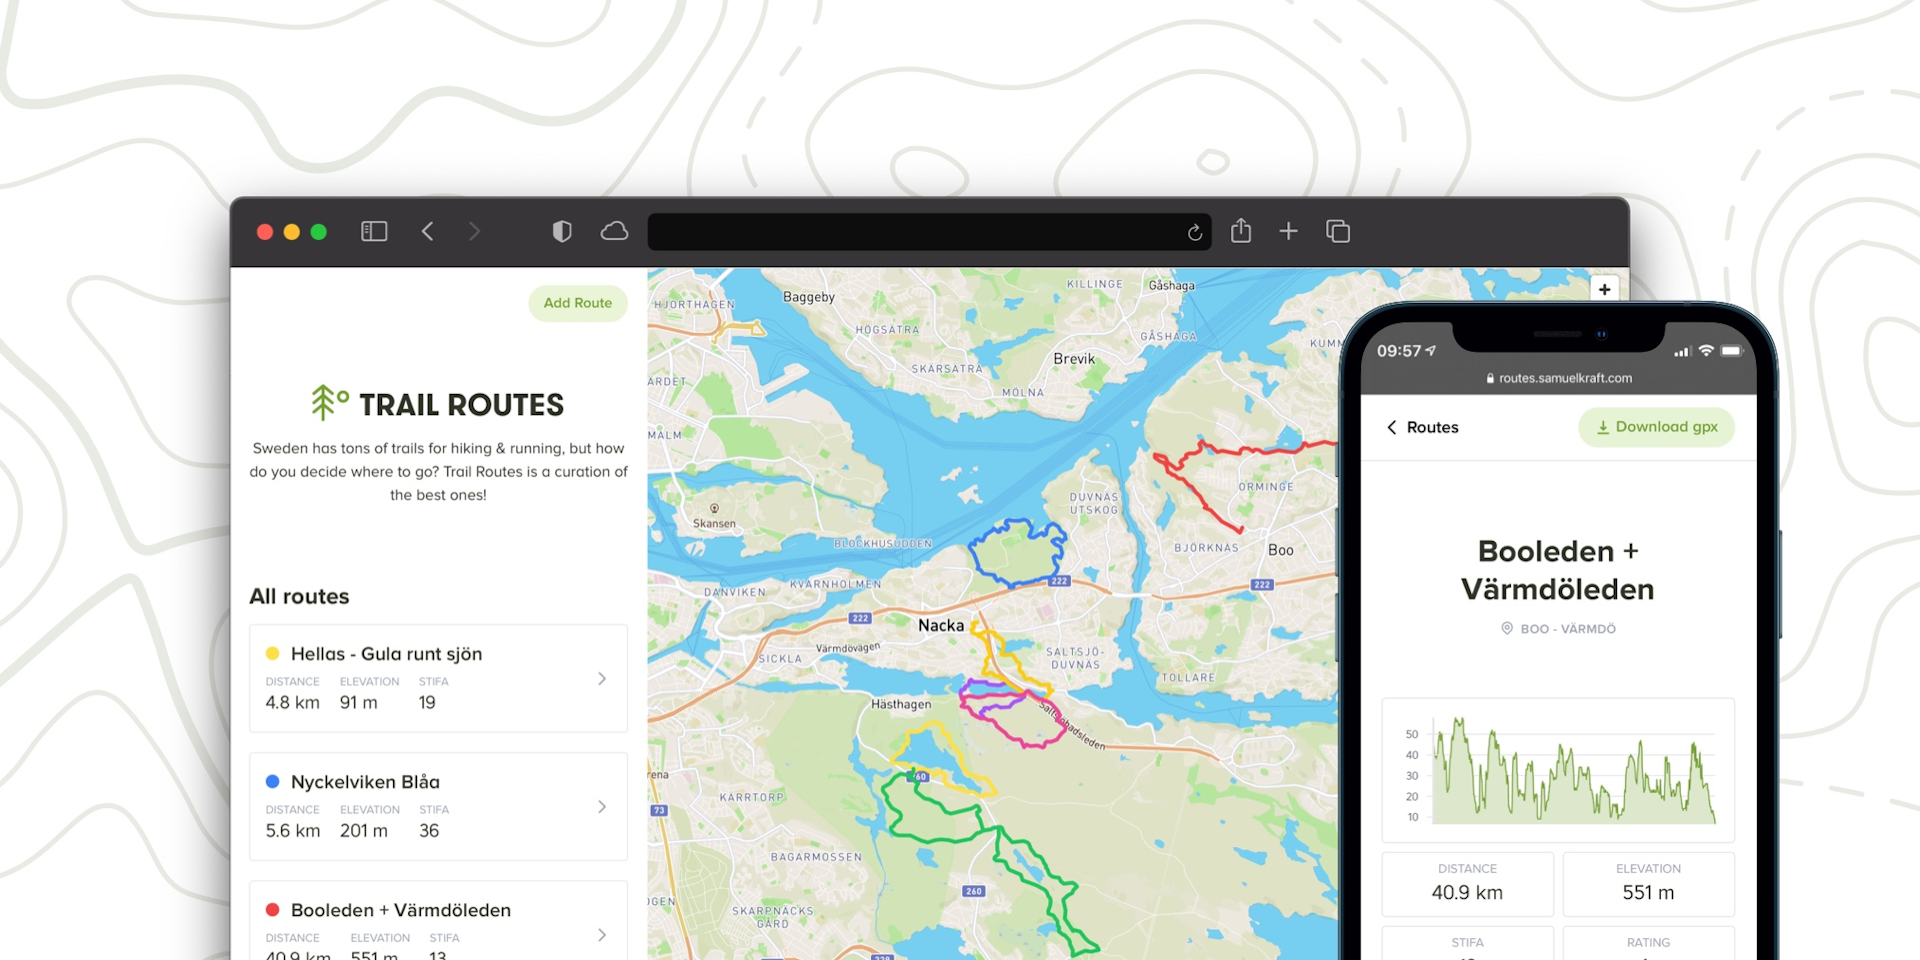
The goal
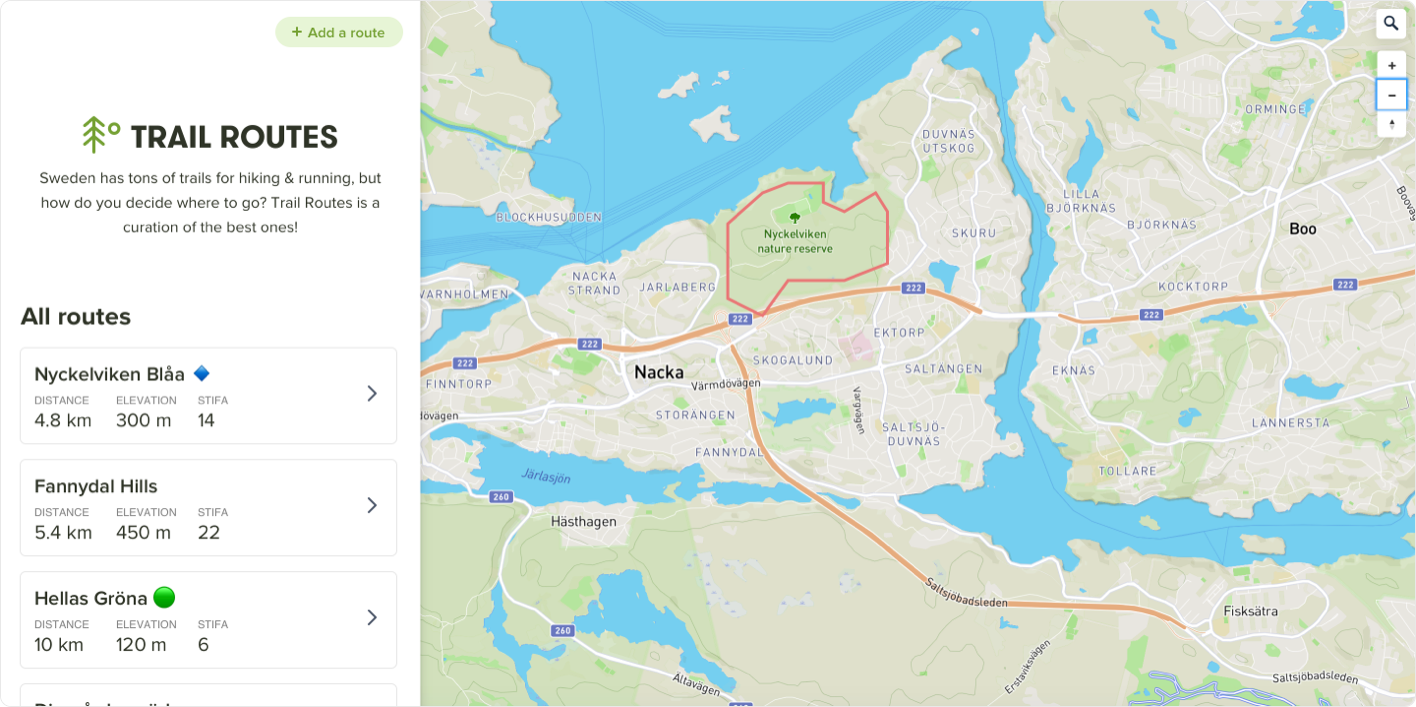
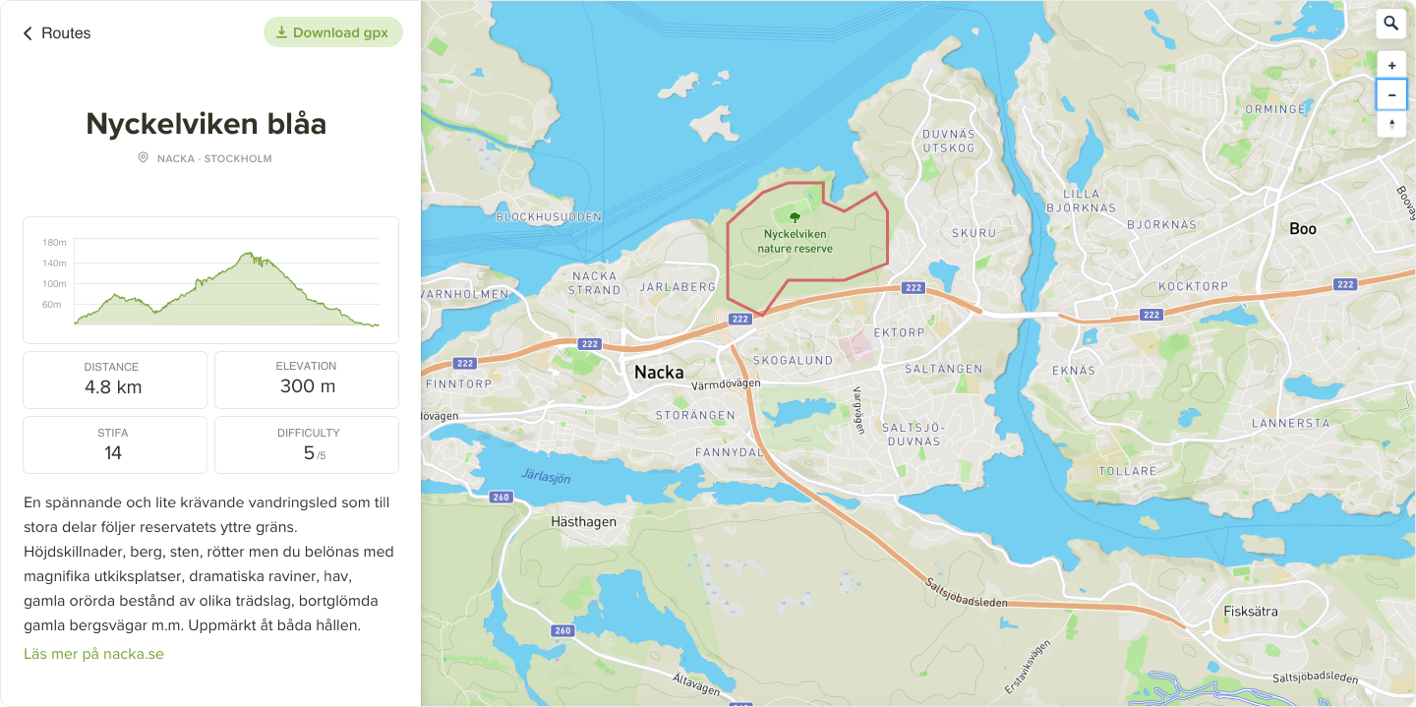
My goal was to show a list of routes I enjoy coupled with basic information like distance, elevation gain and my rating. The routes should be visible on a map, and clicking a route should display more information about it, including an elevation map. There should be a way to download each route as a gpx file.
A gpx file is basically an xml file consisting of coordinates that forms a route. It can also contain other information like heart rate data and elevation if created from an activity. You can transfer gpx files to most modern sport watches and get navigation features.
I opened up Sketch to create a logo and a few mockups of the interface:

Getting the route data
I create all my routes with Stravas Route builder tool which uses Mapbox so that seemed like a great choice for me as well. In order to display things on a Mapbox map you need the data as a geoJson object. My first idea was to use the strava API to fetch the routes I've created, which then returns the data in a mapbox-friendly format. This didn't work very well because I have created TONS of routes on Strava, and unfortunately there's no way to tag or categorise them so I started looking at alternatives.
That's when I found Mapbox's package toGeoJson that takes a GPX file and converts it to geoJson, just what is needed! The code below looks at a public/gpx folder, maps over the files and pulls out the geoJson and creates a slug for each route.
import toGeoJson from '@mapbox/togeojson'
import { DOMParser } from 'xmldom'
import path from 'path'
import fs from 'fs'

const ROUTES_PATH = path.join(process.cwd(), 'public', 'gpx')

const routes = routeFilePaths.map(filePath => {
    const source = new DOMParser().parseFromString(fs.readFileSync(path.join(ROUTES_PATH, filePath), 'utf8'))
    const geoJson = toGeoJson.gpx(source)
    const slug = filePath.replace('.gpx', '')

    return {
        geoJson, slug
    }
})
Calculate geoJson distance with Turf.js
The gpx files from Strava only contains cordinates and some basic metadata, but we're missing distance and total elevation. Luckily we can use an amazing open-source project called Turf.js to do lots of advanced analysis on our geoJson. Look how easily we can calculate the total distance of the geoJson using @turfjs/length:
import toGeoJson from '@mapbox/togeojson'
import { DOMParser } from 'xmldom'
import path from 'path'
import fs from 'fs'
import length from '@turf/length'

const ROUTES_PATH = path.join(process.cwd(), 'public', 'gpx')

const routes = routeFilePaths.map(filePath => {
    const source = new DOMParser().parseFromString(fs.readFileSync(path.join(ROUTES_PATH, filePath), 'utf8'))
    const geoJson = toGeoJson.gpx(source)
    const slug = filePath.replace('.gpx', '')

    // Calculate distance using geoJson
    const distance = length(geoJson)

    return {
        geoJson, slug, distance
    }
})
Parse elevation data from geoJson
The original gpx file from strava contains the current elevation for each point, so in order to calculate the total elevation gain we simply map over the coordinates and sum the difference between each as explained in this article. Credit to Taylor Callsen's initial implemention.
const routes = routeFilePaths.map(filePath => {
    const source = new DOMParser().parseFromString(fs.readFileSync(path.join(ROUTES_PATH, filePath), 'utf8'))
    const geoJson = toGeoJson.gpx(source)
    const slug = filePath.replace('.gpx', '')

    // Calculate distance using geoJson
    const distance = length(geoJson)

    // Calculate elevation gain using coordinate data
    const { coordinates } = geoJson.features[0].geometry
    let elevation = 0
    coordinates.forEach((coord, index) => {
      if (index === coordinates.length - 1) return // stop 1 point early since comparison requires 2 points
      const elevationDifference = coordinates[index + 1][2] - coordinates[index][2]
      if (elevationDifference > 0) elevation += elevationDifference
    })

    return {
        geoJson, slug, distance, elevation
    }
})
That's a lot of parsing and calculation! 😅 I now realized that my choice of using Next.js was a perfect fit for the project. All the parsing can be done at build time inside getInitialProps, and then I can serve a static cached version of the site for all visitors.
Displaying geoJson with Mapbox GL and React
I used the excellent guide from the Mapbox docs on creating a mapbox react component. Mapbox's outdoor map is perfect for this use-case and can be accessed by setting the style to outdoors:
const map = new mapboxgl.Map({
    container: mapContainer.current,
    style: 'mapbox://styles/mapbox/outdoors-v11',
    center: [lng, lat],
    zoom,
  })
We want to add all our geoJson to the map when it has finished loading by mapping over the routes in a map.on('load') callback.
There's two steps to displaying geoJson on the map:
- Add the source
- Add a layer using that source
map.on('load', () => {
  routes.forEach((route: Route) => {
    const { slug } = route
	// 1. Add the source using the slug as unique id
    map.addSource(slug, {
      type: 'geojson',
      data: route.geoJson,
    })

    // 2. Add a layer displaying our route
    map.addLayer({
      id: slug,
      type: 'line',
      source: slug, // same id as above
      layout: {
        'line-join': 'round',
        'line-cap': 'round',
      },
      paint: {
        'line-color': 'red',
        'line-width': 4,
      },
    })
})
We should now have a map showing all our routes 🎉 Right now the color is hardcoded to red, in order differentiate we need to specify a color for each route. In my case I'm saving some extra metadata in a javascript file including a custom color for each:
const colors = require('tailwindcss/colors')

export const meta = {
  nyckelviken: {
    description: '…',
    rating: 5,
    location: 'Nacka · Stockholm',
    color: colors.blue[500],
  },
  hellasgarden_gula: {
    description: '…',
    rating: 5,
    location: 'Nacka · Stockholm',
    color: colors.yellow[300],
  }
}
map.addLayer({
  id: slug,
  type: 'line',
  source: slug,
  layout: {
    'line-join': 'round',
    'line-cap': 'round',
  },
  paint: {
    'line-color': color,
    'line-width': 4,
  },
})
Updating our mapbox map with react
The final feature for our map component is to be able to click each route and the map to zoom in to just that route. In order to get a bigger click area than just the line we added before we can add a transparent fill inside each route:
// Add a fill layer as source for hover, or we lose our click target when inside the path
map.addLayer({
  id: `${slug}-fill`,
  type: 'fill',
  source: slug,
  paint: {
    'fill-color': 'transparent',
    'fill-outline-color': 'transparent',
  },
})
Then when we hover and click that element we can trigger an action, in this case updating our query.
map.on('mouseenter', `${slug}-fill`, () => {
  // Change the cursor style as a UI indicator.
  map.getCanvas().style.cursor = 'pointer'
  // Increase width of route path
  map.setPaintProperty(slug, 'line-width', 6)
})

map.on('mouseleave', `${slug}-fill`, () => {
  map.getCanvas().style.cursor = ''
  map.setPaintProperty(slug, 'line-width', 4)
})

map.on('click', `${slug}-fill`, () => {
  const coords = route.geoJson.features[0].geometry.coordinates
  // Calculate the bounds to know where to zoom to
  const bounds = coords.reduce((b, coord) => {
    return b.extend(coord)
  }, new mapboxgl.LngLatBounds(coords[0], coords[0]))

  // Fit map to bounds/route
  map.fitBounds(bounds, {
    padding: 20,
  })

  // Update the query
  router.push({ query: { route: slug } })
})
Now we just need to remove the other routes from the map. We could do this in the onclick above - but that won't work if we link directly to a specific route (e.g. https://routes.samuelkraft.com/?route=nyckelviken). In order to solve this we can add a useEffect instead with the current query as a dependency. Every time the route/query is updated our function will run and update the visible route on the map. The simplest way i found to remove the non-active routes was not to remove the layers but to simply update the layer's visibility to none. In order to get access to our map object that's only accessible in the original effect we can save it in a local state variable.
const router = useRouter()
const queryRoute = router.query.route

const [stateMap, setStateMap] = useState(null)

useEffect(() => {
  const map = new mapboxgl.Map({
    container: mapContainer.current,
    style: 'mapbox://styles/mapbox/outdoors-v11',
    center: [lng, lat],
    zoom,
  })

	setStateMap(map) // save our map to state to get acces in other useEffects

	return () => map.remove()
}, [])

useEffect(() => {
    if (queryRoute && stateMap) {
      routes.forEach((route: Route) => {
        const { slug } = route

		  // Set the current query route as visible
      if (slug === queryRoute) {
        stateMap.setLayoutProperty(slug, 'visibility', 'visible')
        stateMap.setLayoutProperty(`${slug}-fill`, 'visibility', 'visible')

        const coords = route.geoJson.features[0].geometry.coordinates
        const bounds = coords.reduce((b, coord) => {
          return b.extend(coord)
        }, new mapboxgl.LngLatBounds(coords[0], coords[0]))

        // Fit map to bounds/route
        stateMap.fitBounds(bounds, {
          padding: 20,
        })
      } else {
		  // Hide the rest of the routes
          stateMap.setLayoutProperty(slug, 'visibility', 'none')
          stateMap.setLayoutProperty(`${slug}-fill`, 'visibility', 'none')
        }
      })
    } else {
	  // if no selected route then show all routes and restore the zoom to intial bounds
      routes.forEach((route: Route) => {
        const { slug } = route
        if (stateMap) {
          stateMap.setLayoutProperty(slug, 'visibility', 'visible')
          stateMap.setLayoutProperty(`${slug}-fill`, 'visibility', 'visible')
          stateMap.flyTo({
            center: [lng, lat],
            essential: true,
            zoom,
          })
        }
      })
    }
  }, [queryRoute, stateMap])
That's it for the map component!
Styling with Tailwind CSS
To finalise the app I added the list of routes as a sidebar and styled it with Tailwind CSS. When you click a route and the query changes I used Framer Motion to add a slide animation showing a detail view with the meta information. One issue I had was that the original list was often longer than the detail view and when simply moving it to the side it would still take up space and increase the scrollable portion of the page. The solution to this is to add a transitionEnd property to our animation setting the element to display none.
<motion.div
  animate={
    queryRoute
      ? {
          x: '-30%',
          scale: 0.95,
          transitionEnd: {
            display: 'none', // Completely remove sidebar from the DOM when animation finishes
          },
        }
      : { x: 0, scale: 1, display: 'block' }
  }
  transition={{ ease: 'easeOut', duration: 0.2 }}
>
	// sidebar content
</motion.div>

{queryRoute && (
	<motion.div
	    className="w-full absolute top-0 min-h-screen bg-white -ml-5 -mr-5 px-5"
	    initial={{ x: 430 }}
	    animate={{ x: 0 }}
	    transition={{ ease: 'easeOut', duration: 0.2 }}
	  >
		// detail view content
	</motion.div>
)}
Wrapping up
The last thing I did was create some nice assets, like a favicon and a meta sharing image. Check out Trail Routes and let me know if you enjoyed this write-up by pressing like below!