
Generating Open Graph images with Mapbox & Canvas
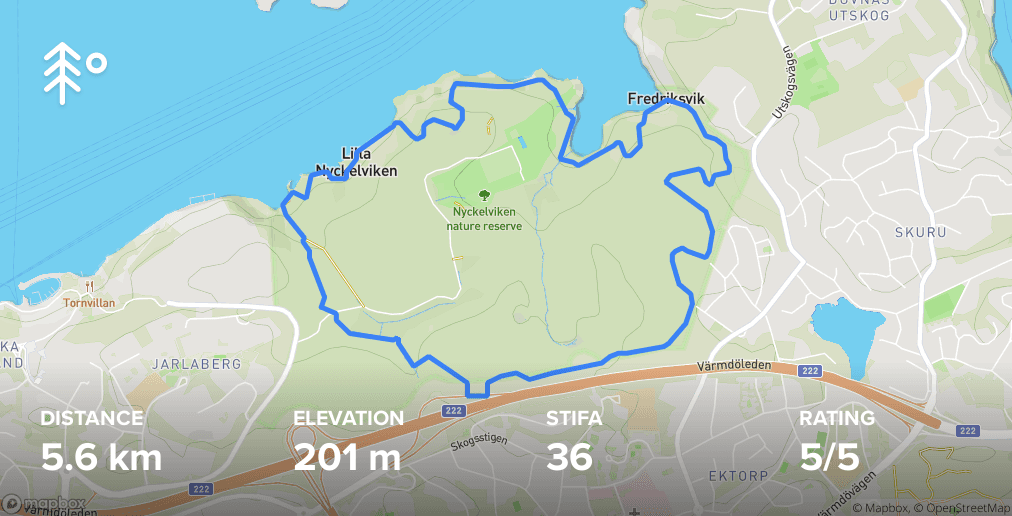
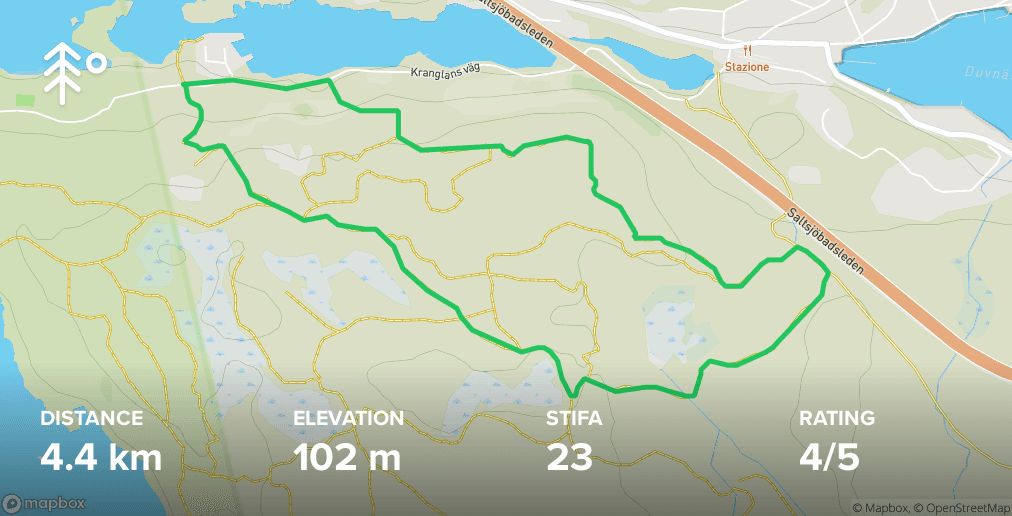
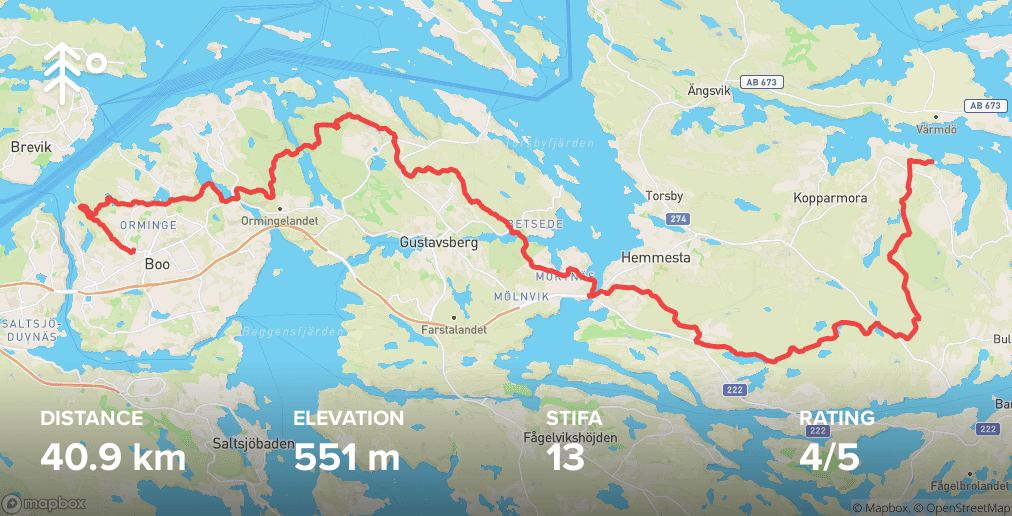
Mapbox is one of the nicest way to embed custom dynamic maps in an app as there are lots of customisation options. I'm using their service on my route exploration website Trail Router to display running & hiking routes from gpx files. In this post I'll go over how I used Mapbox's static image api and Node Canvas to create custom og sharing images like the example below:
The code used looks like this:
const fs = require('fs')
const path = require('path')
const gp = require('geojson-precision')
const simplify = require('simplify-geojson')
const polyline = require('@mapbox/polyline')
const { createCanvas, loadImage } = require('canvas')
const { routes } = require('../utils/gpxutils.js')

const width = 1012
const height = 516

async function generate() {
  await Promise.all(
    routes.map(async route => {
      // simplify the geojson and strip extra points from coordinates to fit mapbox's api
      const geoJson = simplify(gp(route.geoJson, 4), 0.0001)
      // Encode our geoJson to a polyline - replace any "?" with encoded value or mapbox will break
      const poly = polyline.fromGeoJSON(geoJson.features[0].geometry).replace(/\?/g, '%3F')
      // Mapbox wants a hash-less hex value
      const color = route.color.replace('#', '')
      const padding = '80, 80, 120'
      const mapboxImage = `https://api.mapbox.com/styles/v1/mapbox/outdoors-v11/static/path-5+${color}-1(${poly})/auto/${width}x${height}?padding=${padding}&access_token=${process.env.NEXT_PUBLIC_MAPBOX_ACCESS_TOKEN}`

      const canvas = createCanvas(width, height)
      const context = canvas.getContext('2d')

      // Load the mapbox image onto a canvas
      const map = await loadImage(mapboxImage)
      context.drawImage(map, 0, 0)

      // Add gradient in the bottom so overlayed text is visible
      const gradient = context.createLinearGradient(0, height * 0.7, 0, height)
      gradient.addColorStop(0, 'rgba(0,0,0,0)')
      gradient.addColorStop(1, 'rgba(0,0,0,0.5)')
      context.fillStyle = gradient
      context.fillRect(0, height * 0.7, width, height)

      // Add image in top corner
      const logo = await loadImage('./public/logo.png')
      context.drawImage(logo, 40, 40)

      const titleY = 470
      const labelY = titleY - 45
      const distanceX = 40
      const elevationX = width * 0.25 + distanceX
      const stifaX = width * 0.5 + distanceX
      const ratingX = width * 0.75 + distanceX

      // Add titles
      context.fillStyle = '#fff'
      context.font = 'bold 30pt Proxima Nova'
      context.fillText(`${Math.round(route.distance * 10) / 10} km`, distanceX, titleY)
      context.fillText(`${Math.round(route.elevation)} m`, elevationX, titleY)
      context.fillText(`${Math.round(route.elevation / route.distance)}`, stifaX, titleY)
      context.fillText(`${route.rating}/5`, ratingX, titleY)

      // Add labels
      context.font = 'bold 16pt Proxima Nova'
      context.fillText(`DISTANCE`, distanceX, labelY)
      context.fillText(`ELEVATION`, elevationX, labelY)
      context.fillText(`STIFA`, stifaX, labelY)
      context.fillText(`RATING`, ratingX, labelY)

      const buffer = canvas.toBuffer('image/png')
      fs.writeFileSync(path.join(process.cwd(), `public/og/${route.slug}.png`), buffer)
    }),
  )
}

generate()
That's quite a lot to take in so let's break it down step by step!
Setup
In order to use Mapbox static image api you first need an access token. If you don't already have one you can get one from your account page.
The Static Image API allows us to request a static map by providing a couple of parameters like coordinates & zoom level, but you can also add layers like paths and geoJson.
Here's an example of a map generated with the following code:
https://api.mapbox.com/styles/v1/mapbox/streets-v11/static/
-122.337798,37.810550,9.67,0.00,0.00/1000x600?access_token=${MAPBOX_ACCESS_TOKEN}
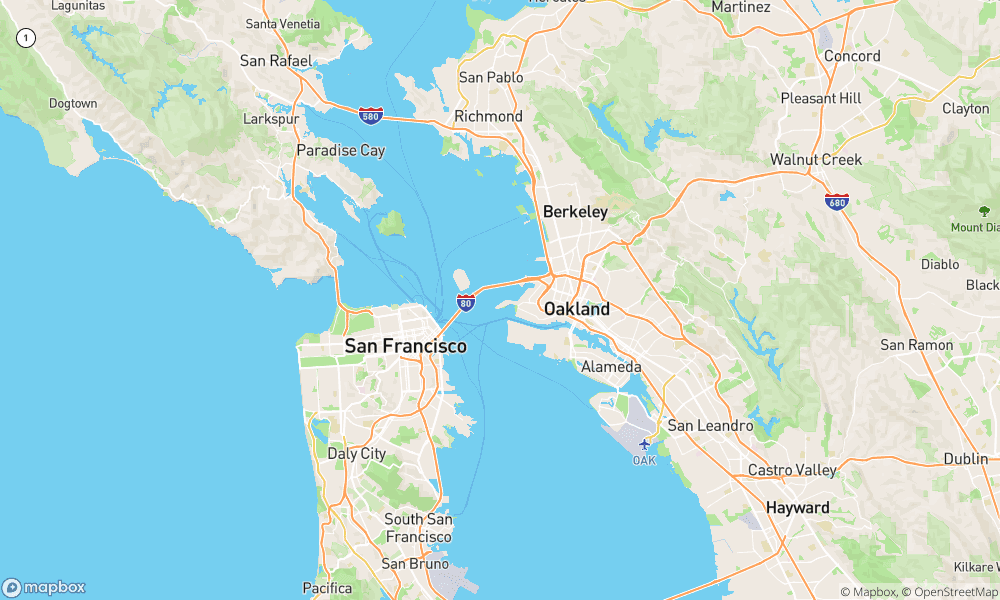
First we have specified the style of the map, in this case streets-v11. Their documentation lists all the available styles. I've mainly used the outdoors-v11 style but you can also desig a custom one specific for your needs.
In this example we have used specific coordinates to specify what we want rendered but we can also make our map automatically fit the bounds to whatever is displayed, like geoJson or a path with the auto paramter.
Using Mapbox's static api with geoJson
Our route data is in the form of a geoJson object. Check out my article Building a mapping platform with React and Mapbox GL for details how to parse geoJson from gpx files.
The api supports geoJson using a geoJson=({}) parameter, however it only accepts 8,192 or fewer characters. Even after simplifying the geojson and removing redundant coordinates to get it below the limit I did not manage to get it working. Instead I opted for the Path parameter which looks like this and accepts an encoded polyline:
path-{strokeWidth}+{strokeColor}-{strokeOpacity}+{fillColor}-{fillOpacity}({polyline})
Encoding geoJson to polyline
To create a polyline from geoJson we can use mapbox's polyline package. In order to make the polyline a bit more lean we can also simplify it with simplify-geojson and geojson-precision.
const gp = require('geojson-precision')
const simplify = require('simplify-geojson')
const polyline = require('@mapbox/polyline')

routes.map(async route => {
  // simplify the geojson and strip extra points from coordinates to fit mapbox's api
  const geoJson = simplify(gp(route.geoJson, 4), 0.0001)
  // Encode our geoJson to a polyline - replace any "?" with encoded value or mapbox will break
  const poly = polyline.fromGeoJSON(geoJson.features[0].geometry).replace(/\?/g, '%3F')
})
It took me a while to figure out that the api does not accept polylines containing question marks "?" as that breaks the url parameters. Be sure to replace all instances with it's encoded counterpart.
Another thing we need to do is remove the # from the color we wish to have, specify the width and height and how much padding we want.
const gp = require('geojson-precision')
const simplify = require('simplify-geojson')
const polyline = require('@mapbox/polyline')

routes.map(async route => {
  // simplify the geojson and strip extra points from coordinates to fit mapbox's api
  const geoJson = simplify(gp(route.geoJson, 4), 0.0001)
  // Encode our geoJson to a polyline - replace any "?" with encoded value or mapbox will break
  const poly = polyline.fromGeoJSON(geoJson.features[0].geometry).replace(/\?/g, '%3F')
  // Mapbox wants a hash-less hex value
  const color = route.color.replace('#', '')
  // Extra padding in the bottom to make space for text
  const padding = '80, 80, 120'
  const width = 1012
  const height = 516
})
Now let's use the polyline in the api url and we have a working map 🎉
const gp = require('geojson-precision')
const simplify = require('simplify-geojson')
const polyline = require('@mapbox/polyline')

routes.map(async route => {
  // simplify the geojson and strip extra points from coordinates to fit mapbox's api
  const geoJson = simplify(gp(route.geoJson, 4), 0.0001)
  // Encode our geoJson to a polyline - replace any "?" with encoded value or mapbox will break
  const poly = polyline.fromGeoJSON(geoJson.features[0].geometry).replace(/\?/g, '%3F')
  // Mapbox wants a hash-less hex value
  const color = route.color.replace('#', '')
  // Extra padding in the bottom to make space for text
  const padding = '80, 80, 120'
  const width = 1012
  const height = 516
  const mapboxImage = `https://api.mapbox.com/styles/v1/mapbox/outdoors-v11/static/path-5+${color}-1(${poly})/auto/${width}x${height}?padding=${padding}&access_token=${MAPBOX_ACCESS_TOKEN}`
})
Adding text on the image with node canvas
In order to add metadata like distance, elevation and logo on top of the image we can use node-canvas. It implements the web canvas API as closely as possible and is perfect for this use case.
If you have ever used Sketch, Photoshop or another application that uses layers you can think of canvas the same way. What is written first (bottom of the layers list in sketch) is the bottom layer, and everthing after that is stacked on top.
In the code below I am adding a gradient before I add the text, that way the gradient will be positioned beneath the text in the final image.
I have commented what each line does in the code below.
// Create a canvas context the same size as out mapbox image
const canvas = createCanvas(width, height)
const context = canvas.getContext('2d')

// Load the mapbox image onto a canvas
const map = await loadImage(mapboxImage)
context.drawImage(map, 0, 0)

// Add gradient in the bottom so overlayed text is visible
const gradient = context.createLinearGradient(0, height * 0.7, 0, height)
gradient.addColorStop(0, 'rgba(0,0,0,0)')
gradient.addColorStop(1, 'rgba(0,0,0,0.5)')
context.fillStyle = gradient
context.fillRect(0, height * 0.7, width, height)

// Add logo in top left corner
const logo = await loadImage('./public/logo.png')
context.drawImage(logo, 40, 40)

// Specify the positions of the text overlays
const titleY = 470
const labelY = titleY - 45
const distanceX = 40
const elevationX = width * 0.25 + distanceX
const stifaX = width * 0.5 + distanceX
const ratingX = width * 0.75 + distanceX

// Add titles
context.fillStyle = '#fff'
context.font = 'bold 30pt Proxima Nova'
context.fillText(`${Math.round(route.distance * 10) / 10} km`, distanceX, titleY)
context.fillText(`${Math.round(route.elevation)} m`, elevationX, titleY)
context.fillText(`${Math.round(route.elevation / route.distance)}`, stifaX, titleY)
context.fillText(`${route.rating}/5`, ratingX, titleY)

// Add labels
context.font = 'bold 16pt Proxima Nova'
context.fillText(`DISTANCE`, distanceX, labelY)
context.fillText(`ELEVATION`, elevationX, labelY)
context.fillText(`STIFA`, stifaX, labelY)
context.fillText(`RATING`, ratingX, labelY)

const buffer = canvas.toBuffer('image/png')
// Write the image to a specified directory
fs.writeFileSync(path.join(process.cwd(), `public/og/${route.slug}.png`), buffer)
That's it! Find the full source code here and check out a few examples of images I generated:
If you liked this post please let me know by pressing ❤️ below!